Tuesday, August 07, 2012

August is Sis Boom month with Jennifer Paganelli

Editor's Note: Our series continues featuring our designers, their latest collections for FreeSpirit fabrics. Week one is a post from the designer, week two is a tutorial and week three is a great giveaway for you to enjoy. Meet the bubbly Jennifer Paganelli.


FreeSpirit Crazy Love by Jennifer Paganelli for Sis Boom

I love, love designing fabric! It's so thrilling to see a design come to life on fabric and then find its way into your homes, your projects and your hearts. It is a real passion and I try to bring something different to each introduction. I love when you recognize it as a Sis Boom fabric. It tells me that there is synergy with every collection I produce. As most of you know, I love a resort vibe and want everyone to see my fabrics and think tropical vacation. Your response to the color is why I do what I do. You tell me color makes you happy! a much larger scale with more geometric flare than ever. Adding a very robust 70's geometric to the mix gets us thinking dashiki's and bedspreads and all over hippiness. 

 
FreeSpirit Crazy Love, introduced earlier this year (25 100% cotton skus), features intense jewel-like colors that dance around on a dark rich saturated palatte.  Taken from love of vintage patinas, these fabrics are certain to charm their way into your hearts and sewing.

FreeSpirit Superfly
FreeSpirit SuperFly (12 100% cotton skus) will give you so many amazing looks. You never tire of the zebra animal print so I brought them back to you in And now, we are premiering FreeSpirit Happy Land (23 100% cotton skus and 4 laminate skus, available in October) which is a strong melody of colors to make your spirit come alive. Think tableclothes and timeless quilts. It's all about celebrating color, sewing and quilting!

Bosco Bowtie PatternTo give you inspiration, for all these colors, here is a simple project certain to add a little touch of spunk and cuteness to a little boy's outfit.  The Bosco Bow tie, which happens to be rated among our top downloaded pattern, is an awesome, easy and fun project.The Bosco Tie hasalso been known to dress up little girls' hairstyles when in use as a head band, AND has even been seen around the necks of our furry friends.  Genius, right?! The pattern is super user friendly and it makes for a great afternoon project. Make a few bow ties and play with the different scales of fabric! You can go from Super Fly, to Crazy Love. You can't go wrong, either way. To check out photos of our Bosco Bow ties in action, visit our Look book. You'll see we're not afraid to pair these little cuties with a pattern dress shirt of little girl's dress. Happy creating!
quilt
 
Happy Land quilt design and sewn by Marsha Moore. Photos Tim Geaney.
FreeSpirit Happy Land by Jennifer Paganelli

Best Blogger TipsShare/Bookmark

Monday, August 06, 2012

Christmas in July Block 17-Tacha at Fat Quarterly

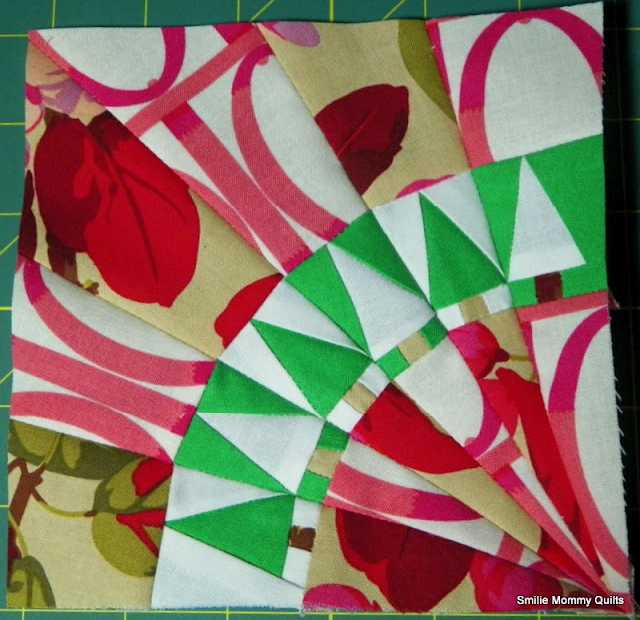
All Wrapped Up by Tacha at Fat Quarterly


Finished size: 8“ square

Cutting Instructions

From the green solid cut:
1 strip 4 ½” x 8 ½”
1 strip 2” x 8 ½”
2 strips 1” x 8 ½”

From EACH of the green dot, blue flower and red leaf prints cut:
2 strips 1” x 8 ½”

Make the Block
Sew one of the green dot 1” x 8 ½” strips along the long edge of the green 4 ½” x 8 ½” strip. Cut this strip into 4 pieces as follows:

1 strip 4 ½” x 5”
2 strips 1” x 5”
1 strip 2” x 5”


Sew the green 1” x 8 ½” strips to both long sides of one of the red leaf 1” x 8 ½” strip. Cut this strip into 4 pieces as follows:

1 strip 2” x 4 ½”
2 strips 1” x 2”
1 square 2”

Sew the green 2” x 8 ½” strip to along the long edge of one of the blue flower 1” x 8 ½” strips. Cut this strip into 4 pieces as follows:

1 strip 2 ½” x 4 ½”
2 strips 1” x 2 ½”
1 strip 2” x 2 ½”


Take the 3 pieces 4 ½” wide from each of the strips and sew them together as shown.


Take the 3 pieces 2” wide and sew them together as shown.


Take the 1” wide strips and sew them together to make 2 strips as shown.

Sew the block together as shown.

Best Blogger TipsShare/Bookmark

Friday, August 03, 2012

Christmas in July Block 16-Free Patchwork Quilt Info

Tiffiny from Free Patchwork Quilt Info has brought us today's tutorial for our Christmas in July, Block-A-Thon. So click the link below and enjoy!


Best Blogger TipsShare/Bookmark

Thursday, August 02, 2012

A Cute Apron Tutorial!


Everyone needs a cute apron in the kitchen to whip up some delicious treats! So enjoy this tutorial for a half apron and happy baking! And thanks to Melissa for bringing us this great tutorial!


Best Blogger TipsShare/Bookmark

Wednesday, August 01, 2012

Christmas in July Block 15-Quilting Gallery

Bull’s Eye


Designed by: Michele Foster


Block finishes at 6” (6.5” unfinished)

The Bull’s Eye block has been designed by Michele Foster of the Quilting Gallery. Prepared for the Christmas in July Block-a-Thon hosted by FreeSpirit Fabrics.


Visit: http://quiltinggallery.com/ 

Cutting:

Note: Strips are cut by the width of a fat quarter, i.e approximately 20”

Background fabric (white):
(1) 1” strip
(1) 2” strip - you may need two strips depending on how skewed you do the trims.

Center square:
(1) 2” square

Accent fabric (turquoise/white):
(1) 1.5” strip
Instructions:
With your 2” square, skew it a little. Trim less than 1/8” of fabric off of two sides at an angle to the edge of the exiting square.


With the 1” strip of white, add borders to two sides of your 2” square. Be sure to over-extend the edges. Press the seams toward the white. Trim the edges flush with your 2” square.


Repeat for the other two sides.


Repeat the above steps adding your 1.5” accent fabric to both sides, and trim flush. Press the seams toward the accent fabric.

Add the other two sides, and trim flush.


Skew two sides of your block a little. Trim less than 1/8” of fabric off of two sides at an angle to the edge of the exiting square unit.

Add the 2” white strip to two sides and trim flush. Press seams toward the white border.


Repeat with the other side.


Lay your 6.5” square ruler on top of your block.

Once you’ve found a pleasing angle, trim two sides, rotate the block, align your ruler to your cut edges and trim the other two sides. Your unfinished block should measure 6.5”
Best Blogger TipsShare/Bookmark