Friday, December 28, 2012

We love our blog followers. Tell us a bit about yourself. Take our quick survey between now and January 2, 2013 and we will select one random survey participant to win a 30 pc. FreeSpirit Fat quarter bundle!
https://www.surveymonkey.com/s/3KBQF96


Best Blogger TipsShare/Bookmark

Wednesday, December 19, 2012

Our friends over at Generation Q Magazine have asked for a favor and we are happy to pass it on. Oh, and there’s a bribe in it as well.


GenQ last poked and probed into your fabricky lives in late 2011, with their GenQ Modern Quilters Survey. Now it’s time to do it again with the GenQ 2012 Addicted Stitcher Survey. (New name, same mission.) We as well as GenQ like to count noses, pins, rotary cutters, whatever it takes to grab a detailed snapshot of this niche in the sewing and crafting world.

Some of you have pained expressions, and you’re probably sighing with annoyance at yet another attempt for the corporate q-niverse to stick its demographic-hungry noses into stuff that just isn’t its business. The truth is that all of us stitchy types thrive when our industry answers our needs. And that’s what this survey does. It helps to provide information to the industry so your needs, and wants, can be better met.

Please take a few minutes to whip through the survey and tell GenQ all about you -- there could be swag in it for you. The survey will be live until the end of the December 2012, and on Jan. 1, 2013, we’ll choose FIVE lucky survey-takers who will each receive a box of fabric, books and small stitchy goodies valued at $50 each.

Just use this link to find your way to the 2012 Addicted Stitcher Survey. And please freely post it far and wide, encouraging your friends and sew-pals to also participate! Thank you so much for being a part of this second annual survey! And if you want to know more about what we do, check us out at GenerationQMagazine.com.

Stand up and be counted!

Best Blogger TipsShare/Bookmark

Monday, December 17, 2012

12 Weeks of Christmas-Week 12!!

This is the LAST tutorial for our 12 Weeks of Christmas tutorial posts! You know what that means, Christmas is DAYS away! So check out the amazing tutorial below and get sewing!

Hey! This is Kati from From the Blue Chair! One great way to wrap gifts is in gift bags. Gift bags have a downside though. They are both expensive and wasteful. Fabric gift bags are a great alternative. This simple, reversible tote is roughly based on fairly standard gift bag sizes. The bag comes together quickly and can be a second gift on top of what is inside.  These bags are made from fabrics from the Fortiny line by Tina Givens.


STEP 1: Cut fabric, interfacing and template plastic as shown in chart for bag size.
STEP 2: Apply interfacing to bag pieces and handles as instructed on interfacing directions.
STEP 3: Make handles:
  • Fold handle pieces in half along the length with wrong sides together to find center. Press crease. 
  • Open, then fold each long raw edge of the fabric to the center line. Press.
  • Fold along the center line, matching the now folded in edges.
  • Edge stitch along the length of each long side.  Leave short ends unfinished.  
STEP 4: Make removable base:
  • Match smaller fabric rectangles with right sides together.  
  • Sew ½” seam along both long sides and one short side.  Clip corners.  Turn right-side out.  Press.  
  • Slide template plastic inside this sleeve.   The plastic should fit snugly.  Trim plastic slightly if too difficult to slide into the sleeve.  Make sure seam allowances lay flat.  
  • Tuck raw edge inside the sleeve, around the plastic.  Use wonder clips rather than pins to keep this raw edge in place while stitching closed.  
  • Edge stitch 1/8” from edge.  This may require stitching through the template plastic.  Stitch slowly.  Do not press this piece once the template plastic has been inserted as it will melt and warp with the heat.
STEP 5: Make the bag:
  • Fold each large rectangle in half along the width and sew a ¼” seam up both sides.  Press seams open.
  • On each bag piece, smooth and flatten bottom corner to make boxed base.  Make sure seam is centered.   Draw a line the length of the base for the bag size as shown on chart.  (i.e. If making the small bag, draw a 4” line for a 4” base.  Draw a 5 ½” line for the medium size bag. Draw a 6" line for large bag.)  Stitch across this line, backstitching at the ends of the seam.  Trim excess fabric.  (see photos)
  • Baste handles to one bag piece.  Mark the center point on the front and back of bag piece.  For handle placement measure and mark on either side of this center point.  (Measure 2” for the small bag, 2 ½” for the medium bag, and 3” for the large bag).  With right side of bag out, place handle ends  over marks allowing end to overlap past bag top about ¼”.  Stitch to secure.  Ensure that handles are not twisted before attaching.
  • Sew bag sections together.  Place the bag piece with handles attached inside the other bag piece, right sides together.  Line up side seams.  Pin or clip in place.  Pin along the top of the bag.  Sew ¼” seam around the top.  Leave a 4” hole for turning.  Backstitch well.  Reinforce handles with zig-zag stich. Turn bag and lining through the hole.  Press well.  Press raw edges of the hole in.  Edge stitch 1/8” along the entire top rim of bag.
  • Fit finished bag base inside bag.  
Finished!
Best Blogger TipsShare/Bookmark

Thursday, December 13, 2012

Stuff your Crafty Stocking Contest!


We're excited to team up with some fantastic bloggers and companies to help you have the craftiest Christmas ever! Enter the Stuff Your Crafty Stocking Giveaway for your chance to win one of five HUGE stocking stuffers. The total of all prizes is valued at more than $2,000!

To enter the giveaway, simply "Like" all of the Facebook pages below, and fill out the Google form letting us know you did. We know you will love them just as much as we do!


Make sure you only enter ONCE, because this form is shared on all of the participating sites. Duplicate entries will be deleted, and giveaway ends Monday, Dec. 17th. Good luck!  
* This promotion is in no way sponsored, endorsed or administered by, or associated with, Facebook. We hereby release Facebook of any liability. No purchase necessary. For alternate entry, e-mail lindsay(at)craftbuds(dot)com with your full name and the subject line "Stuff Your Stocking Contest." The sponsors will ship all prizes within 7 days of the end of the giveaway. Giveaway starts Monday, December 10th at midnight pm EST and ends Monday, December 17th at midnight EST. Once the giveaway ends, winners will be chosen using Random.org and contacted within 24 hours by e-mail. This main contest post at CraftBuds.com will be updated with winners’ names once we’ve heard back from them. Winners will need to respond within 48 hours to claim their prize or another winner will be chosen. Some giveaways open worldwide. Best Blogger TipsShare/Bookmark

Monday, December 10, 2012

12 Weeks of Christmas-Week 11!

Hello, Freespirit fans!  It's my pleasure to guest post today with a tutorial as part of the 12 Weeks of Christmas.  If you enjoy this tutorial, quilt-alongs, sewing contests and such, you'll probably like my blog at Stitched in Color.  I've been a big Anna Maria Horner fan from the beginning, so it's fun to be here!  Without further ado, let's get started....

Zigzag Cover Tutorial

Supplies
  •  1/3 yard Main Fabric  (shown in Simple Plaid Corduroy from Chicopee by Denyse Schmidt)
  • (9) 3" squares Zigzag Print (shown in Paisley Corduroy from Chicopee by Denyse Schmidt)
  • (9) 3" squares Zigzag Solid (shown in Freespirit Solid)
  • Standard composition book, 7.5" x 9 3/4"
  • Note:  Non-directional fabrics are best for any prints used.  Since the plaid print was directional, the direction of plaid stripes differs between the zigzag and background portions.
Step 1:  Cutting

Beginning with your main fabric, cut an 5" wide width-of-fabric (WOF) strip and a 3" wide WOF strip.  Shorten both to 26.5" long, producing 5" x 26.5" and 3" x 26.5" pieces.  Use the remaining main fabric to cut (9) 3" squares and (1) 3.5"x 12" strip. 

Cut zigzag print and solid fabrics to make (9) 3" squares per fabric.  Slice all 3" squares in half on diagonal, as shown.  This will create a 18 triangles per fabric: main fabric, zigzag print and zigzag solid.

Zigzag Cover0001

Step 2:  Zigzag Piecing

Layout your triangles to create a zigzag design.  You'll have 3 rows of triangle pairs:  main fabric with zigzag print, zigzag print with solid and solid with main fabric.

Begin by sewing all triangles into pairs.

Zigzag Cover0002

When matching triangles right sides together for piecing, overlap fabrics slightly as shown.

Zigzag Cover0003

Make sure the triangle points stick out just enough so that your 1/4" seam allowance begins and ends at the location where both fabrics' raw edges meet.
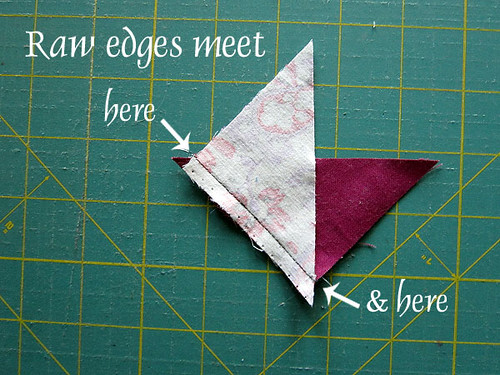
Zigzag Cover0004

When sewn properly and pressed open, the triangle pair will have neat, flush corners.  This can take a bit of practice, so don't be shy with the seam ripper.  That's how we learn!

Zigzag Cover0005

After creating pairs, sew pairs together to create long rows of triangles.
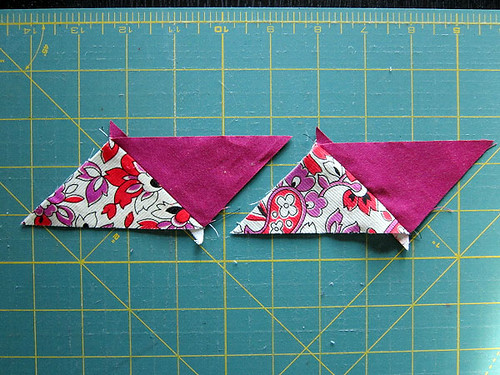
Zigzag Cover0006

Again, overlap fabrics as shown.  Be slightly generous when overlapping fabrics at this stage!  The 1/4" seam allowance should intersect the matched raw edges as before.
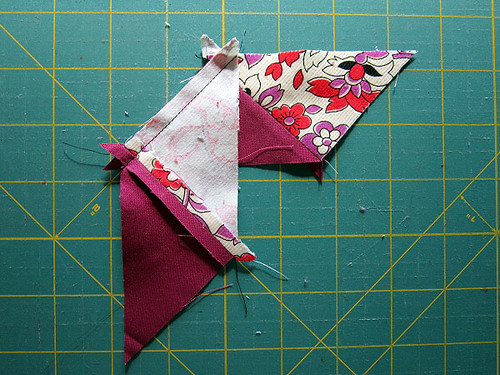
Zigzag Cover0007

When sewn properly and pressed open, the triangle set will have 1/4" seam allowances extending beyond each triangle tip!

Zigzag Cover0008

Piece together all 3 rows of triangle pairs. Each row will have 9 triangle pairs total.

Zigzag Cover0009

Note:  I learned this style of piecing zigzags from Anna Maria Horner's Folk Dance quilt pattern, a free pdf.  I prefer it to the half-square-triangle method of piecing zigzags since it uses larger triangles, which creates a zigzag with fewer seams and more beautifully presented fabric.  The drawback is that the triangle rows have exposed biased edges.  Take care when sewing rows together not to stretch your fabrics!


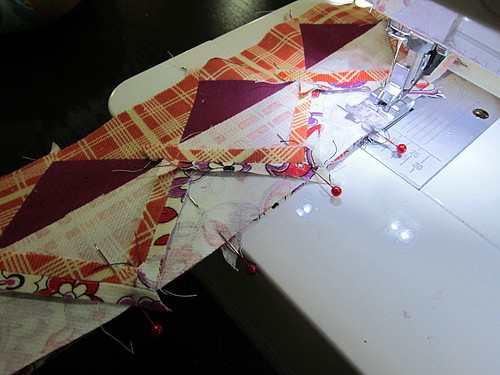
When joining zigzag rows, match triangle points so that rows are stacked right on top of each other with no offset.  Use lots of pins to ensure triangles remain aligned while sewing and to discourage stretching.  Join with a scant 1/4" to preserve triangle points.
Zigzag Cover0010 

Lastly, press row seams open.  Trim zigzag section to 26.5" wide, cutting off irregular sides.

Zigzag Cover0011


Step 3:  Piecing the Cover

Add the 3" x 26.5" main fabric piece above the triangle row and the 5" x 26.5" piece below.  In both cases, sew with the wrong side of the zigzag section facing up so that you can see the seam allowance and be sure not to sew through the triangle tips.

Press seams open.  Then, trim the work-in-progress so that it is 12" tall x 26.5" wide.

Add the 3.5" x 12" main fabric piece to the left side of the work.  Press seams, then trim to 12" x 29.5".

Zigzag Cover0012

Step 4:  Finishing

Turn under the 12" sides of the cover by 3/4".  Press the 3/4" fold on each 12" edge.  Finish the turned under edges with a 1/8" topstitch.  Lastly finish the raw, turned under edge of the 12" sides with an overcast or zigzag stitch to prevent fraying.  (I overcast the raw edges after the top stitching because I feel it increases accuracy to delay it.)

Zigzag Cover0013

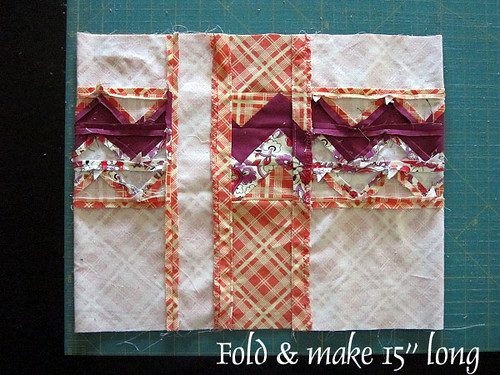
Back at your cutting mat, lay the work right side up.  Fold one side in about 6 1/2" and then fold the other side in about the same amount.  As you fold, you are exposing the wrong side of the work and creating the inside flaps of the journal cover.  Fiddle with it until your folded work is 15" long, with both flaps about the same size (about 6 1/2" each).  Check the total length (15") against the cutting mat lines.  A bit of the right side portion should still be revealed at center.
Zigzag Cover0014

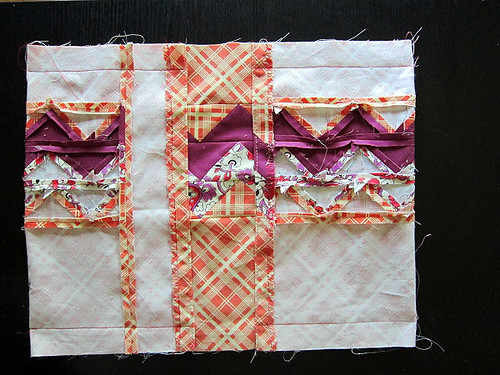
Now, use a clear quilting ruler to mark sewing guidelines at 1" from the top and bottom long edges.  Mark these guidelines over the wrong side portion only, skipping the right side exposed at center. Then, pin and stitch along the marked lines only, backtacking at the start and finish of each line.
Zigzag Cover0015

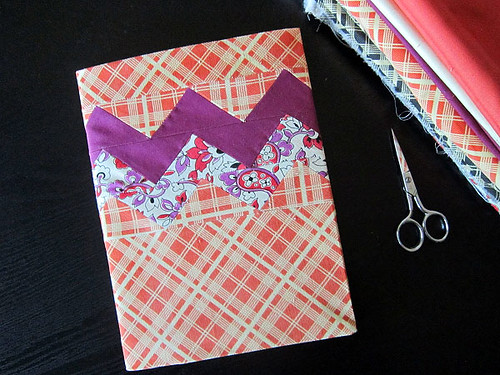
Clip corners and turn right side out.  Press thoroughly.  I often use a little spray starch to get the cover a bit crisp!  Slide in the composition book, which will require bending the cover all the way back at one point.

Zigzag Cover0016

Zigzag Cover0020

More more details and photographs of the finishing steps, see my general Journal Cover tutorial.  I've made all sorts of these covers, but this is my first public tutorial for a pieced version.
 Zigzag Cover0018

I'd love to see your creations at the Stitched in Color flickr group.  Happy stitching!

Zigzag Cover0021

Best Blogger TipsShare/Bookmark

Sunday, December 09, 2012

Piourette winners announced, just in time for the Holidays!

We are a bit late in this announcement but we selected six random commentators who told us of their dreams to be or not to be a ballerina.  These lucky winners can now dance their way to their sewing machines and make their dreams, whether being a ballerina or Pulitzer prize winner, come true.  Congratulations to Chickadee Jess, Joyce, ritainalaska, Erin Quinn, Marcie W. and This Dog's Mom who will each receive six, 1 yard cuts of FreeSpirit Piourette by Verna Mosquera. Watch your emails for a message! Ho, ho, ho! Best Blogger TipsShare/Bookmark

Monday, December 03, 2012

12 Weeks of Christmas-Week 10!

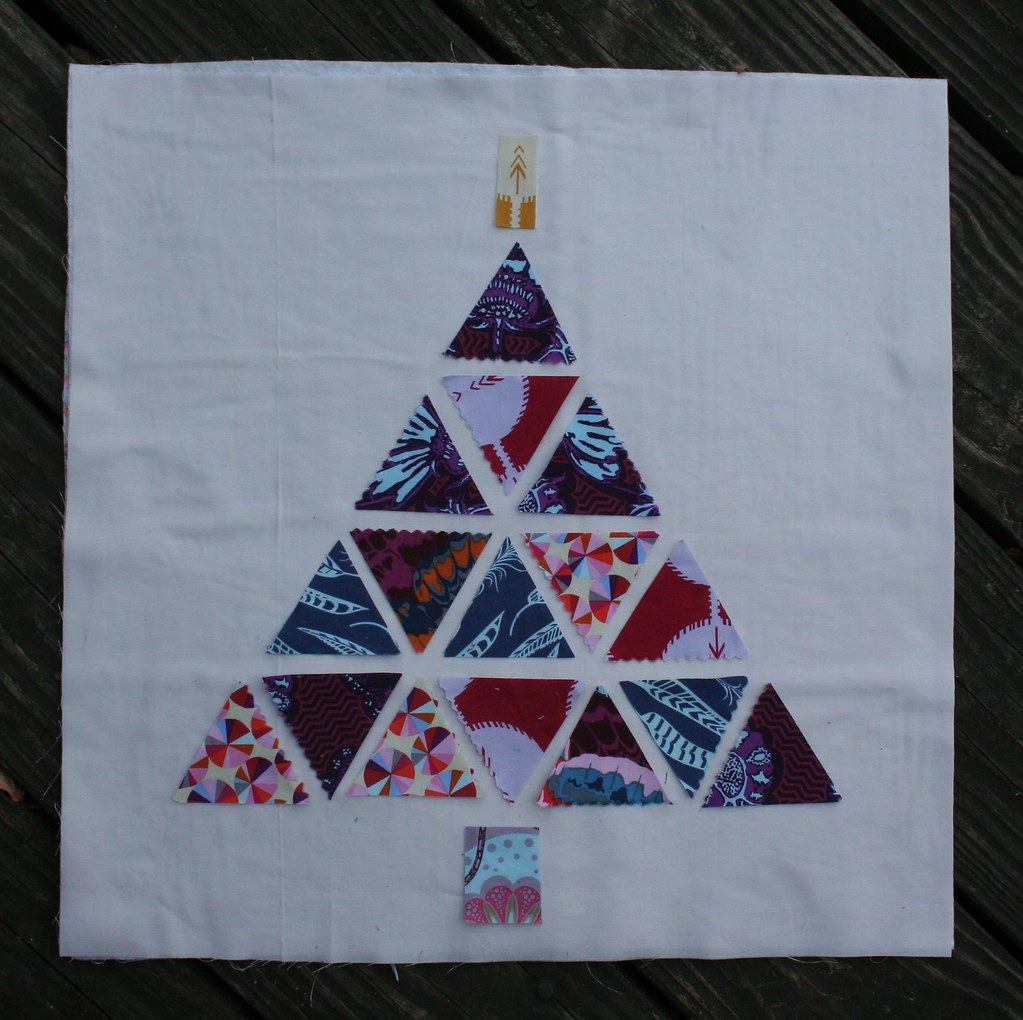
Tree Study2

My name is Katie Blakesley, and I blog at Swim, Bike, Quilt. I'm happy to be sharing Tree Study, a holiday wall hanging as part of Week 10 of FreeSpirit's 12 Weeks of Christmas.

Since it is already December (how did that happen?), I wanted to design something simple that featured  the rich colors in Anna Maria Horner's Field Study line.  The saturated, bold colors work well in this holiday wall hanging (or pillow), yet it's a project that doesn't scream "Christmas."

Supplies
Charm Pack, Jelly Roll, or a variety of FreeSpirit prints/solids
2/3 yard neutral solid
20'' x 20'' piece of batting
2/3 yard backing fabric (or 1/2 yard with plans to piece the back)

Materials

Cutting
(17) 2 1/2'' Equilateral Triangles
20'' x 20'' neutral solid square
20'' x 20'' batting
20'' x 20'' backing fabric (if using a 1/2 yard of fabric, piece the back)
(2) 2 1/4'' x width of fabric strips for binding

Cut 17 equilateral triangles in a variety of prints--remember that equilateral triangles have 3 equal 60 degree angles.

1. Cut four or five 2 1/2'' x 12'' strips in different fabrics.

2.  If you have an equilateral triangle ruler, use it to cut multiple triangles of each fabric. [Note: Tri-wreck rulers are not equilateral triangles. I have made that mistake before].

3. If not, locate the 60 degree angles and lines on your quilting ruler.

Line the bottom of the 2 1/2'' strip along the 60 degree line on your ruler (or parallel to the line as shown.) Cut along the left hand side of the 60 degree line.

IMG_1993

4. Rotate your ruler, and make sure to line the ruler up with the triangle point (at the top). This time, line the fabric along the bottom 60 degree line, and make a cut on the right hand side.

IMG_1994

5. Continue rotating your ruler in this way to cut additional triangles.

IMG_1995


6. Make a quilt sandwich (solid fabric, batting, backing fabric)--baste with pins or spray baste.

7.  Lay out your quilt triangles as shown below. If you would like, use a water soluble pen, chalk, or hera marker to draw guide lines around the outside of the large triangle, or straight horizontal lines for the rows. I just went for it.

IMG_1980

8. Using a walking foot and the ticker tape method popularized by Amanda Jean, mark and sew a straight line down the middle of the Christmas tree. Because the wall hanging is small, there is no need to attach or pin the triangles. If one falls off while you are quilting, just set it back in its place and keep going.

IMG_1982

9. Mark a straight line about 5 inches on both sides of your center line--this will work as a visual guide in case your straight lines start getting a little bit crooked. Continue to straight line quilt on either side of the center line, radiating outward. I used the edge of my walking foot as a guide. 

Note: Don't worry if the lines aren't exactly straight--the net effect of the densely quilted lines will "read" as straight. Unless you really do want them exactly straight, in which case I would mark most of the lines with a hera marker. 

IMG_1983

I added a little "star" at the top of my Christmas tree because I thought the Coordinates print in Saffron was perfect.

10. Continue quilting until you have filled the entire wall hanging with lines. I suggest that you rotate your wall hanging after every few lines, sewing top to bottom, then bottom to top. This will help with the fabric "pull" at the bottom of the wall hanging.

sewing close up

11.  Bind the wall hanging using the 2 1/4'' strips and your favorite binding method. 

This wall hanging would also work well as a pillow. Once you finish quilting the pillow top (but before you bind it) use Susan's envelope back pillow tutorial and voila! A new Christmas pillow to keep or gift.

Happy holidays and happy sewing!
~Katie Best Blogger TipsShare/Bookmark