

Hello! Amanda and I (Mel) are thrilled to be
sharing some fun beginner projects to build new skills for 2018. We love
playing with FreeSpirit Fabrics because of the rich colours, the diversity of
patterns and the amazing designers. We’re going to be showing you the way to
build confidence using bold prints, fussy cutting, and some traditional skills
creating Dresden plates and Yo-yos. So enjoy! These small beginnings will give
you the basics to add elements to your designs.
Making a lampshade
Circles have been a big trend in the
quilting world over the last few months but they seem daunting to many. They
really needn’t be. There are wonderful templates available to make life easier,
whether you are sewing a curve by machine or hand. We’ve chosen to show you how
to create a wheel using the Dresden plate. We’re a big believer in taking bite
size chunks when you start out, so using these skills we’re going to embellish
a lampshade.
Fabric and Other
Supplies
Kathy Doughty’s Horizon collection: 9 fat
quarters and a Fat quarter in ‘Blowing Away’
·
Lampshade Kits
(We chose Need Craft Uk 30cm diameter kit)
·
Dresden plate
template
·
15cm Metal Sewing Measuring Gauge Ruler (optional)
·
Scissors, rotary blade and mat
·
Plastic acrylic rule (optional)
·
Thread
·
fusible interlining (preferred but not
essential)
·
white craft glue
·
Sewing Machine optional
|
Step1
Press! Iron your
fabrics. I would keep steam off on this one. You want the fabrics as crease
free as possible.
|
Step 2
Open the lampshade
kit and familiarise yourself with the materials involved. You need to draw an
outline on the fabric. Take the large sticky back plastic and place it onto
your 50cm long strip of shot cotton fabric. We used our acrylic ruler to help
hold the plastic in place and to measure out the extra needed on the ends. You
will need to allow extra fabric than the kit suggests as it will shrink in
size when you applique onto it. Use a pencil and sketch around the plastic to
create an outline. On one end allow an extra 5 cms. Allow and extra 4 cm top
and bottom. Place a pin to mark out the horizontals. Your plates must not
exceed these pins.
|
   |
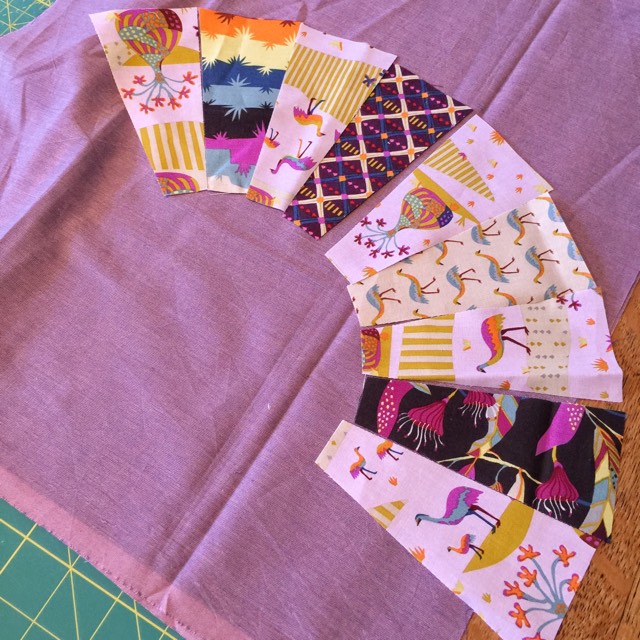
Step 3
Measure and cut the
Dresden Plates. Now you can cut your own template, but we use the EZ Quilt
Dresden template. Acrylic templates make life so much easier and we use this
little one all the time. On the template it clearly marks out different
measurements to cut to. For the purposes of this project, we are using the 5”
line. Place over your fat quarter and adjust so that you can highlight a
particular image. Fussy cutting can be so much fun. From the detailed ‘Boab
Plains’ pattern, we focused on the birds and the trees.
Top Tip: Use a blank
piece of paper either side of the template to block out the outside fabric.
This simple trick will help you to focus on what you want to cut.
Once you are happy,
cut. We used 3 pieces each from 5 of the fabrics and 10 pieces from one main
fabric – which in our case was the ‘Boab Plains’.
Top Tip: The larger
the print the bigger variety of views you can create.
|
   |
Step 4
Once cut, lay out the
templates onto the background fabric within the outline you created earlier.
Play with the order until you are satisfied with the colour placement.
|
Step 5
Time to sew! We use a
quarter inch seam and sew 9 plates together. Make sure you back stitch at
each end. Once sewn time to press. We chose to press the seams open to help
the fabrics lie as flat as possible to the lampshade. Repeat the process two
more times, but remove one of the Boab Plains templates so there is only 8
plates on each.
Note: To make the
full wheel, just keep sewing more plates until you have the full circle. The
process is the same.
|
|
|
Step
6
Pressing.
Your lovely half moons need to be pressed. Use a ruler to mark out when you
need to fold too. We love a measuring gauge ruler. Simply set to the quarter
inch and use that as a guide. Using a pencil we’ve marked the back of the
fabric on the seams where the quarter inch falls. Use this pencil mark as a guide and press
from seam to seam. Check again with ruler to check accuracy.
|
   |
Step
7
Cut
the centre circle. For the purpose of this project we are going to the use
the brilliant pattern ‘Blowing Away’ because the pattern has larger circles
that are the perfect fit. At this point you have a choice.
1 –
You could cut 1cm extra around the large circle and press under and applique,
or
2 –
As this is a lampshade and never going to be washed, we chose to use fuseable
interlining and a raw edge for the circle. We will use a decorative zig zag
stitch to join the circle to the plates and to the background fabric.
So
we need 3 of the larger circles for the centre pieces. Rough cut outside the
outer line of the circles, approx a 1cm out from the last line. Place fabric
onto the fuseable interlining. The back of the fabric and the glue side
should face each other.
Tip:
If you have never used the fuseable kind before, feel both sides. One side
will feel slightly fuzzy and one side will feel a bit bobbly. Those little
bumps are the glue.
Press
with a hot iron. Make sure there is no steam. You will want to press the circle
itself, the excess fabric will help give your iron a little room so that you
are not gluing the interfacing onto your iron. When pressed, Allow to cool
and cut out the perfect circle, using the pattern as a guide.
|
  |
Step
8
Laying
out and pinning time. Lay the three half moons out onto the background
fabric. Ensure you leave at least 3 centimetre gap from the top and bottom.
Pin onto the background fabric. We used about 14 pins on each one to really
make sure it stayed put!
Top
Tip: Place your pins through the fold. Pinning the corners flat and to the
background will keep the seam as flat as possible.
When
pinning the centre circle, a minimum quarter inch is advised. We used 1cm to
make sure the top of the plates were secured under the circle.
|
 |
Step
9
Sewing
the plates onto the fabric. Thread choice is up to you depending if you would
like it to disappear or become part of the detail. We chose a soft lilac
which worked with the collection and disappeared slightly into the background
colour. At this point you have a choice how to sew the plates onto the
fabric. You could
a-
Hand sew using a stitch like
a ‘slip stitch’. Stitching then disappears in the fabric and your plates will
look like they float on the background or
b-
Machine sew. You can use a
basic top stitch to secure it, or do as we did and choose a zig zag for a bit
of detailing.
We
chose to zig zag onto the plates itself and not cross over onto the
background fabric. This helps keep the background fabric flat with no fear of
any bunching underneath. We love the effect and when the light bulb is lit
behind it, the light will show off the stitching.
Top
Tip: Practice your stitching first. Moving from the regular cotton to the
shot cotton, the texture is different, and it took a couple of go’s to be
happy with the stitch length and effect.
|
   |
Step
10
Now
to fix the finished sewn item onto the plastic. Most kits will have
instructions so familiarise yourself with the specific instructions. The best
tip for this next process is to take it slow.
Now
please remember we had extra fabric. You will use the extra on one end to
turn and form a hem, thereby hiding any raw edge. Line up your pencil outline
to the sticky backed plastic. Cut away excess fabric on the top and bottom
and leave extra on one end. Stick one end to the plastic and slowly remove
the paper backing. Brush out any creases as you go along. It will try to curl
on you, so you may find your acrylic ruler may be of some help to flatten as
you go along.
Fold
the excess fabric on the one end and form a hem. Click the perferated edges
of the plastic and remove the small strips. Do this slowly to minimise
fraying of the fabric.
Fold
the hem onto the back of the plastic (which will be the inside of the lampshade.Use
the double sided tape provided to stick down. When the fabric has been fully
placed onto the plastic it is fixed, no waiting required.
Layout
the ‘shell’ of the lampshade. Use weights or a ruler to lie it flat as
possible.
Use
the double sided tape provided and stick onto the rings. Remove the backing
of the tap from both rings. This is fiddly and sticky, but perservere! If you
have some that can help you at this point great, but it’s the tape is so
sticky you can do this on your own.
You
are going to roll the rings across the plastic and the tape with stick and
carry the plastic along as you go. Start on the end with the raw edge as this
will be covered in the finished product. Both rings should stick on their own
if you have them balanced right. Then slowly roll the rings forward and
adjust both, keeping them close to the edge. When fully rolled. Use more tape
on the vertical edge to secure the hemmed end for a neat finish.
You
now have a nice taught drum. Take the lose fabric on the top and bottom and
roll around the rings, tucking the fabric behind the metal ring. When in
place and stuck, you may wish to use some PVA glue to permantly fix and keep
any lose threads in place. A thin bead around the rim, and finger press away
any fraying or lose strands. Leave to dry.
For
a video tutorial, of the lampshade
process, the Need Craft instructions… https://youtu.be/DBx3Wh9UwAA.
|
      |
And
you now have a lampshade! You’ll never want a store bought one again!
|
 |


