Tuesday, November 27, 2012

The making of a ballerina! Piourette giveaway time!

Yesterday we did a photo shoot in an old southern home, not necesarily a plantation but one that reminds you that you are in the land of rocking chairs on wrap around porches.  One of the fabrics shot was FreeSpirit Piourette from Verna Mosquera.  We had an adorable 4 year old model who fell in love with the tutu she modeled, declaring she no longer wanted to be Taylor Swift but a model.  To Miss Karsyn we bequeth the Piourette tutu and leotard!  To you, our ever faithful blog followers, we want to bequeth some FreeSpirit Piourette fabric. Did you ever dream of being a ballerina? Have all your dreams come true and do you still dare to dream?  Comment by midnight Sunday, December 2nd and six, random commentators will be selected to receive six, 1 yard cuts of Piourette by Verna Mosquera -- it may make your dreams come true!

Best Blogger TipsShare/Bookmark

Monday, November 26, 2012

12 Weeks of Christmas-Week 9!

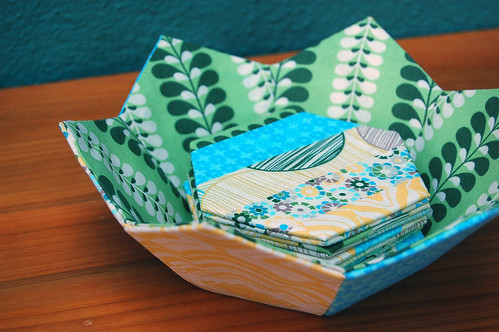
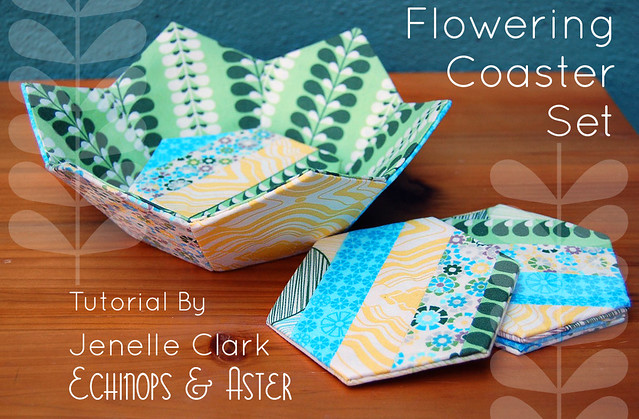
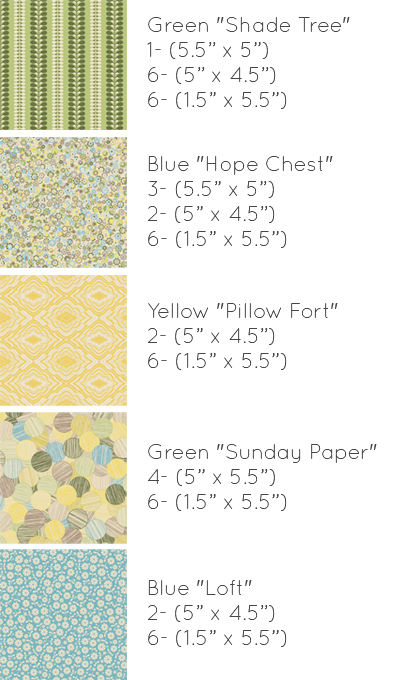
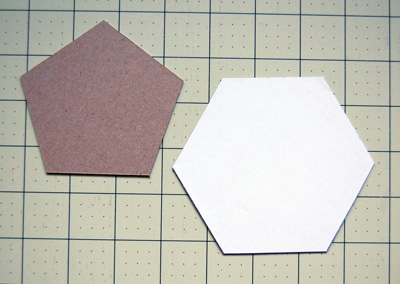
The Hot Mess Casserole Carrier


This tutorial is brought to you by Sara at SewSweetness so once you are done checking out the tutorial, head over to her blog for a giveaway!

This casserole carrier is the perfect companion to your holiday meal. It conveniently holds a 13” x 9” baking dish. Sturdy straps and an insulated lining make this bag the perfect treat for yourself, or awe-inspiring as a hostess gift. Perhaps this year, your handmade casserole carrier will outshine the turkey.
All seam allowances are 1/2” unless otherwise noted.

Finished Size: 13 1/2” x 9 1/2” x 5”


Supplies

1 yard exterior fabric

1/2 yard lining fabric

1 1/2 yards Pellon SF-101 Shape Flex fusible woven interfacing

1 yard Pellon #TP971 Pellon Thermolam fusible interfacing

1/2 yard Pellon #975 Insul-Fleece

3/4 yard Pellon #520 Deco-Fuse

36” zipper

1 package (3 yards) of double-fold bias tape

From the exterior fabric, cut:

2 rectangles, 14 1/2” x 10 1/2”, for the Exterior Main Panels

2 rectangles, 25” x 4”, for the Handles

1 rectangle, 36” x 6 1/2”, for the Exterior Zipper Panel

1 rectangle, 10 3/4” x 6”, for the Exterior Side Panel

From the lining fabric, cut:

2 rectangles, 14 1/2” x 10 1/2”, for the Lining Main Panels

1 rectangle, 38” x 6 1/2”, for the Lining Zipper Panel

1 rectangle, 10 3/4” x 6”, for the Lining Side Panel

From the Shape Flex, cut:

2 rectangles, 25” x 4”

1 rectangle, 38” x 6 1/2”

1 rectangle, 10 3/4” x 6”

From the Thermolam, cut:

2 rectangles, 14 1/2” x 10 1/2”

1 rectangle, 38” x 6 1/2”

1 rectangle, 10” x 5”

From the Insul-Fleece, cut:

2 rectangles, 14 1/2” x 10 1/2”

From the Deco-Fuse, cut:

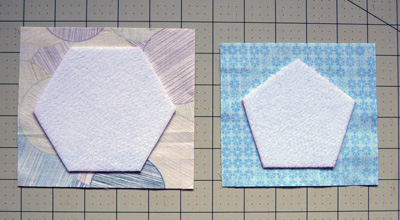
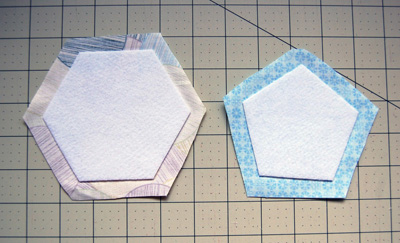
2 rectangles, 13 1/2” x 9 1/2” (round out the corners with a kitchen glass and trim)


Fuse the Fabrics

           1.         Take the Exterior Side Panel and the corresponding piece of Thermolam. Fuse the Thermolam to the wrong side of the Exterior Side Panel using manufacturer instructions. Repeat for the Exterior Main Panels and Exterior Zipper Panel.
            2.         Take 1 of the fused Exterior Main Panels and the corresponding piece of Deco-Fuse. Fuse the Deco-Fuse, centered, to the interfaced side of the Exterior Main Panel using manufacturer instructions. Repeat for the remaining Exterior Main Panel.
            3.         Take 1 of the Handle pieces and the corresponding piece of Shape Flex. Fuse the Shape Flex to the wrong side of the Handle using manufacturer instructions. Repeat for the remaining Handle, Lining Side Panel, Lining Main Panels, and Lining Zipper Panel.
            4.         Using a kitchen glass, round out the corners of the fused Exterior Main Panels and the Lining Main Panels. Trim.
            5.         Baste the Insul-Fleece to the wrong side of the Lining Main Panels using a 1/4” seam allowance. The “shiny” side of the Insul-Fleece should be facing the wrong side of the fabric. After basting in place, quilt the fabric if you so desire.
Attach the Zipper
1.          If needed, trim your zipper so that it is exactly 36” long.


2.         Take your Exterior Zipper Panel and draw a horizontal line that is down 1” from one long edge. Cut along this line. Repeat for the Lining Zipper Panel.
3.         Put the zipper foot on your sewing machine. Place the larger piece of the Exterior Zipper Panel right side up, with the long edge horizontally. Place the zipper on top along the top edge, right side down. Pin in place. With your zipper foot on and using a 1/4” seam allowance from the top raw edge, stitch the zipper in place, from one end to the other.
4.         Place the larger piece of the Lining Zipper Panel right side up with the long edge at the top.  Place your exterior piece right side down onto the lining fabric piece, with the zipper at the top. Pin in place. Sew directly on top of the stitching from the previous step, except stop and start 1/2” from each end.

 5.         Turn the fabrics from the previous step so that they are wrong sides together. Press. Topstitch along the edge of the main fabric pieces from one end of the zipper to the other, 1/8" away from the zipper tape. Stop and start 1/2” from each end.


 6.         Repeat Steps 3-5 for the other side of the zipper and the small pieces of the Exterior Zipper Panel and Lining Zipper Panel. Remove the zipper foot from your machine.


7.         Take the completed Zipper Panel and the Exterior Side Panel and sew, right sides together, along one short edge. Repeat with the remaining short edge of the Exterior Top Panel. You will only be sewing the exterior fabrics.
           
8.         Repeat the previous step to sew the Lining Zipper Panel to the Lining Side Panel. You will only be sewing the lining fabrics.

Make and Attach the Handles

1.         Press one Handle in half lengthwise, with wrong sides together. Measure and make a mark that is down 1/2” from the top long edge, and up 1/2” from the bottom long edge. Press along these marks toward the wrong side of the fabric.


2.         Press the Handle in half again, enclosing the long raw edges. Topstitch the long edges of the Strap using a 1/8” seam allowance.


3.         Make a mark that is in 10 1/2” from each short end of the Handle.
            4.         Fold the Handle in half between those marks. Pin in place.

5.         Sew on top of the folded area on both edges using a 1/8” seam allowance.

           6.         Make two marks on the Exterior Zipper Panel that are in 14 ½” from each short edge.  Take the completed Handle and place to the inside of the marks on the Exterior Zipper Panel piece. The raw edges of the Handle should be even with the raw edges of the Exterior Zipper Panel. Pin in place.

            7.         Draw a horizontal line on top of each Handle that is up 4” from the bottom of the Exterior Zipper Panel.

            8.         On top of the previous line of stitching, sew on top of the Handle using a 1/8” seam allowance. You will be sewing up the left-hand edge (stopping at the line that you drew), pivot, sew directly on top of the line, pivot, then sew down the right-hand edge.

            9.         Place the Exterior Side Panel and the Lining Side Panel wrong sides together. Make marks that are in 2” from each short edge.
         10.       Repeat Steps 1-8 for the remaining Handle and the marks on the Exterior Side Panel.

Assemble the Bag
           1.         Take 1 of the Exterior Main Panels and 1 of the Lining Main Panels. Place them, wrong sides together, and baste in place using a 1/8” seam allowance. Repeat for the remaining Exterior Main Panel and Lining Panel. Also repeat this step to baste together the Exterior Zipper Panel and Lining Zipper Panel. Also, draw a line on all 4 corners of both Main Panels, in the same places. This will help you line up your panels when you sew the 2nd one to the Zipper Panel (so that your bag will not turn out wonky).
 

2.         Take the assembled Side Panel and 1 of the assembled Main Panels. Place the long edge of the Exterior Side Panel against the raw edge of the Exterior Main Panel and pin in place. All Handles should be in 3 1/2” from each respective corner. When you get to the corners, gently ease through the curve. Continue easing and pinning the Side Panel along the raw edge of the Exterior Main Panel until you have worked your way all around. Push the Handles to the inside so you do not sew over them. Sew along the pinned edge. Press the seam toward the Side Panel.

3.         Unzip the zipper at least halfway. Repeat the previous step to attach the remaining Main Panel to the Side.
4.         Turn your bag so that the lining side is facing you, and gently push the corners out so that the raw edges are exposed. Open up the bias tape. Press in one short edge by ½”. Beginning with 1 Side Panel and the pressed edge of the tape, ease the tape all along the entire raw edge of the Side Panel. The long edge of the tape should be aligned with the raw edge of the Side Panel. Pin in place. When you get all the way around and return to the pressed edge of the bias, trim the tape 1/2” past where the 2 edges of the tape meet. This will enclose the raw edge of the tape.

5.         Sew on top of the bias tape, along the first pressed edge, to secure it in place.

6.         Fold the bias tape over to the other end of the seam. Fold the pressed edge of the tape inside itself. Pin in place. Stitch on top of the bias tape using a 1/4” seam allowance.
7.         Repeat steps 4-7 to apply the bias tape to the remaining raw edges of the bag.

8.         Turn the bag right side out and press well.


Best Blogger TipsShare/Bookmark

Monday, November 19, 2012

12 Weeks of Christmas-Week 8!

Flowering Coaster Set

Happy Holidays! I'm Jenelle from Echinops & Aster, where I blog about all of my creative adventures in quilting, embroidery, and sewing. I'd love the chance to get to know you better, so feel free to stop  by whenever you get a chance and say "Hi"! And right now, after you check out my tutorial, head over to my blog for a FreeSpirit GIVEAWAY!

I've been looking forward to having the chance to share a fun tutorial with you today as part of the 12 Weeks of Christmas series! When I think about my favorite parts of the winter season, one thing I look forward to most is getting cozy under a quilt with some hand stitching and a mug of my favorite cocoa. I thought why not share that moment today with a tutorial to make a hand stitched Flowering Coaster Set. 

Flowering Coaster Tutorial

Stitch and enjoy a movie or take this project along with you. Using English Paper Piecing techniques and hand-stitched construction, it's completely portable and really allows you to utilize those spare moments during the busy holiday season when you might be traveling or simply waiting. In no time you'll have the perfect hostess gift, ready for your next holiday get-together! 

Fabric Requirements:
1 FQ each from "In My Room" by Jenean Morrison:
  • Green "Shade Tree"
  • Blue "Hope Chest"
  • Yellow "Pillow Fort"
  • Green "Sunday Paper"
  • Blue "Loft"
Other Supplies and Notions:
  • 1/2 yard 71F Peltex single sided fusible
  • Hand sewing needle
  • Basting thread
  • Coordinating thread (neutral cream color)
  • Thread wax or thread conditioner (optional, but helpful)
  • Printed copies of PDF Template Sheets (see below for more info)
  • Scrap thin cardboard (like from a cereal box)
  • Washable glue stick 
  • Marking pen or pencil
Cut the following fabric pieces:

Flowering Coaster Tutorial

Step 1: Print out the template sheets making sure to set your print scaling to "none" or "100%" depending on your printer settings. Print two copies each of page one and page two. I used cover-stock to print my templates, but heavier weight copier paper will also work. Carefully cut out each shape. Then adhere one of the hexagon shapes and one of the pentagon shapes to the thin cardboard and trim to size to create two templates.

Flowering Coaster Tutorial

Step 2: Using the cardboard templates, trace on the non-fusible side of the Peltex six pentagons and  thirteen hexagon shapes each. Cut these out carefully using scissors.

Flowering Coaster Tutorial

Step 3: Gather all six of the (5" x 4.5") pieces in the Blue "Hope Chest", Yellow "Pillow Fort", and Blue "Loft" prints. On the wrong-side of each piece, center a pentagon shape leaving a generous 3/8" to 1/2" seam allowance all the way around the shape. Following the manufacturer's instructions, fuse the pentagons to the fabric pieces. The grab one of the (5" x 5.5") fabric pieces in the Green "Sunday Paper" print and center one of the hexagon shapes on the wrong-side leaving the required seam allowance all the way around. Fuse the hexagon to the fabric.

Flowering Coaster Tutorial

Step 4: Trim all the way around each fused shape leaving a generous 3/8" to 1/2" seam allowance.

Flowering Coaster Tutorial

Step 5: Baste the hexagon and pentagon shapes to the fused Peltex using your preferred English Paper Piecing (EEP) method. If using thread wax or conditioner, apply it to the basting thread.

My Preferred EEP Method:
Begin by tightly folding over the seam allowance on one edge of the shape. Then inserted the needle through this fold, coming up through the peltex last, leaving the thread knot on the right-side of the fabric. This makes removing basting stitches easier later on.

Flowering Coaster Tutorial

Flowering Coaster Tutorial

Then moving around the shape clockwise, fold the corner fabric neatly (like a present) and insert the needle down through the fold to tack in place. Then make an additional stitch in the center of the newly created side fold (see below).

Flowering Coaster Tutorial

Flowering Coaster Tutorial

Keep turning the shape clockwise, basting each corner and side fold until the shape is completely wrapped. Finally press the shape, using starch if desired.

Flowering Coaster Tutorial

Flowering Coaster Tutorial

Step 7: Arrange the wrapped pentagons around the sides of the hexagon to form a flower shape. Distribute the prints as desired. Then whipstitch the pentagon shapes to the sides of the hexagon using coordinating thread, keeping right-sides together. To make the whipstitching as invisible as possible, only grab a few threads with the needle in each stitch and make sure the thread color is closely matched to the fabric (I used a neutral cream color). Press when finished to set stitches.

Flowering Coaster Tutorial

Flowering Coaster Tutorial

Step 8: Then begin whipstitching the sides of the pentagons together to form the outer bowl shape (also using the coordinating thread). Stitch with the wrong-side facing out.When finished stitching the bowl shape together, gently push the bowl right-side out (the wrong-sides will then be inside the bowl). Set aside for later.

Flowering Coaster Tutorial

Step 9: Collect each of the (5" x 5.5") and (5" x 4.5") pieces in the Green "Shade Tree" print. Taking the remaining printed paper templates and the washable glue stitch, glue baste six of the pentagon templates to the centers of each of the (5 x 4.5") fabric pieces as well as the remaining hexagon shape to the center of the (5 x 5.5") fabric piece, leaving a 3/8" to 1/2" seam allowance on each. Trim around each shape leaving the required seam allowance and thread baste using your preferred (EEP) method. Press each finished wrapped shape, using starch if desired.

Flowering Coaster Tutorial

Step 10: Whipstitch the wrapped pentagon shapes to the hexagon sides (just as detailed in Step 7) and press to set stitches. Then whipstitch the pentagon sides together to form the inner bowl shape. 

Flowering Coaster Tutorial

Step 11: Taking the outer and inner bowl shapes, stack them together snuggly as shown. Adjust as needed until all of the point and sides of the shapes align. Using an invisible ladder stitch, sew together the top edges of the bowl. When finished, sew a small tack stitch in each of the six corners of the hexagon in the base of the bowl to help further anchor the inner and outer pieces together. Then carefully remove all basting stitches. The bowl is  now finished!

Flowering Coaster Tutorial

Flowering Coaster Tutorial

Step 12: To make the coasters, collect all of the (1.5" x 5.5") pieces of fabric. Lay them out in groupings of five as desired. Then chain stitch the strips of fabric together (using a sewing machine) to form six (5" x 5.5") pieced rectangles. Press all seams open.

Flowering Coaster Tutorial

Step 13: Center on each pieced block one Peltex hexagon shape, leaving a generous 3/8" to 1/2" seam allowance. Following the manufacturer's instructions, fuse the hexagons to the pieced rectangles. Then trim around each shape leaving the required seam allowance. Thread baste using your preferred (EEP) method and press, using starch if desired. Repeat this step for the remaining (5" x 5.5") fabric pieces in the Green "Sunday Paper" and  Blue "Hope Chest" prints.

Flowering Coaster Tutorial

Step 14: Pair one pieced hexagon with one non-pieced hexagon, wrong-sides together, lining up all the edges and points. You may wish to use a binding clip to hold them in place. Then using an invisible ladder stitch, sew the top and bottom of the coaster together. Repeat for all six coasters and give a quick press to each if desired.
     
 Flowering Coaster Tutorial     

Then enjoy your new coaster set immediately or wrap it up and give it as a gift (with some of your favorite holiday cocoa mix, of course). : )

Also make sure to post picks of your finished projects in the Flickr group here. I can't wait to see what you'll make!

Flowering Coaster Set

Copyright Jenelle Clark 2012 / For Personal Use Only
Best Blogger TipsShare/Bookmark

Tuesday, November 13, 2012

Piourette by Verna Mosquera . . . Ballerinas In Pink


I am so excited about the opportunity to share my new fabric line Pirouette for FreeSpirit. One of the best things about being a designer/artist is that you never know when an inspiration will arrive. Last year while attending Road To California I stopped in my favorite booth, Nifty Thrifty Dry Goods. Anyone who's ever popped in knows it's a sea of wonderful vintage ribbon, buttons and trims. Immediately I was taken in by these delicious pieces of vintage lace in the most wonderful mocha color.

Next I found a gorgeous rose appliqué in shades of pink flamingo on a sand background. Before I knew it, in that 10 x 20 foot booth an inspiration was born. I ran and asked my assistant for a cellophane bag and began to fill it with the most interesting treasures. A collection of ivory, mocha, pink and green elements. As I looked at what was growing it took me back to a time I spent in Paris many years ago with my husband. We spent numerous hours admiring the works of Degas. The delicious colors in the celo bag reminded me of those wonderful paintings of ballerinas I has seen so many years ago.
Ballerinas In Pink by Edgar Degas from wikipaintings.org
I took my bag of treasures home and when I arrived I began to hunt for images of those Degas paintings. Sure enough before long, there it was! A delicate piece called Ballerinas In Pink. I could hardly believe my eyes. The colors in the painting were exactly as I had remembered and exactly as those in my bag full of vintage materials.

In that moment Pirouette was born. I took the color palette and mixed it with wonderful vintage inspired prints. Romantic florals, vintage ticking, tartan plaid and a playful dot. I even did a tonal print filled with ballet terms. I took the pink flamingo and stretched the color to its darkest shade a delicious ruby red. To bring in a cooler color I added green but mixed a little yellow to have it keep a vintage feel.
Verna at Quilt Marke showing off her Piourette Quilt
It was hard to wait for the fabrics to arrive but meanwhile I began to envision a quilt design. I thought of a ballerina silhouette and other ballet images. Enter Prima Ballerina, an appliqué design in my recognized style. The ballerina dress was the perfect spot for the largest floral in the collection. I want that dress!!! As usual the quilt grew and the playful images we're so fun to envision each fabric in.
Much to my wonderful surprise Elyse of Westminster Fibers suggested making a ballet dress out of the collection which I think is terrific! Did I mention my only regret is not having studied ballet? I can't imagine a more graceful art. The imagery of ballerinas, tutus and ballet shoes could not be more romantic. Art is so personal and mine is often filled with that which I hold dear.
When my yardage finally arrived I was thrilled to begin working with it. Aside from Prima Ballerina I decided to make up some fun pillows from my Pillow Parade pattern. Next came some fun holiday stockings from my Christmas Treasures pattern. The line was so much fine to play with. In my mad rush to head off to market I even whipped up two projects from my upcoming book, A Vintage Sewn Lifestyle - a darling laundry bag and a charming apron.

What I love most about Pirouette is the versatility of the collection. I can hardly wait to return to my studio to keep making more things. I still want to whip a few little girls dresses and a patchwork quilt. I might even cover a chair or footstool for my living room. Maybe cover some lampshades, the possibilities are endless. I hope everyone will be as inspired by the collection as I am.


Best Blogger TipsShare/Bookmark