
Hey! This is Kati from From the Blue Chair! One great way to wrap gifts is in gift bags. Gift bags have a downside though. They are both expensive and wasteful. Fabric gift bags are a great alternative. This simple, reversible tote is roughly based on fairly standard gift bag sizes. The bag comes together quickly and can be a second gift on top of what is inside. These bags are made from fabrics from the Fortiny line by Tina Givens.

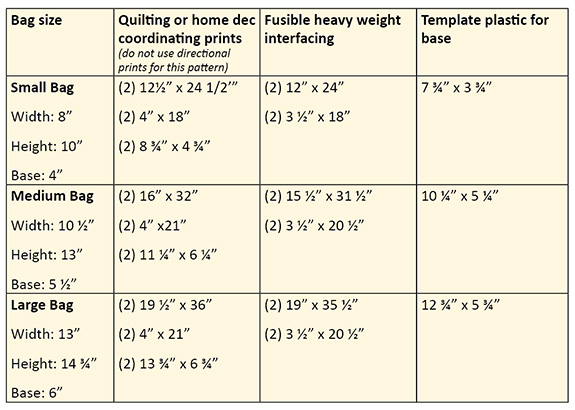
STEP 1: Cut fabric, interfacing and template plastic as shown in chart for bag size.
STEP 2: Apply interfacing to bag pieces and handles as instructed on interfacing directions.
STEP 3: Make handles:
- Fold handle pieces in half along the length with wrong sides together to find center. Press crease.
- Open, then fold each long raw edge of the fabric to the center line. Press.
- Fold along the center line, matching the now folded in edges.
- Edge stitch along the length of each long side. Leave short ends unfinished.
STEP 4: Make removable base:

- Match smaller fabric rectangles with right sides together.
- Sew ½” seam along both long sides and one short side. Clip corners. Turn right-side out. Press.
- Slide template plastic inside this sleeve. The plastic should fit snugly. Trim plastic slightly if too difficult to slide into the sleeve. Make sure seam allowances lay flat.
- Tuck raw edge inside the sleeve, around the plastic. Use wonder clips rather than pins to keep this raw edge in place while stitching closed.
- Edge stitch 1/8” from edge. This may require stitching through the template plastic. Stitch slowly. Do not press this piece once the template plastic has been inserted as it will melt and warp with the heat.
STEP 5: Make the bag:


- Fold each large rectangle in half along the width and sew a ¼” seam up both sides. Press seams open.
- On each bag piece, smooth and flatten bottom corner to make boxed base. Make sure seam is centered. Draw a line the length of the base for the bag size as shown on chart. (i.e. If making the small bag, draw a 4” line for a 4” base. Draw a 5 ½” line for the medium size bag. Draw a 6" line for large bag.) Stitch across this line, backstitching at the ends of the seam. Trim excess fabric. (see photos)
- Baste handles to one bag piece. Mark the center point on the front and back of bag piece. For handle placement measure and mark on either side of this center point. (Measure 2” for the small bag, 2 ½” for the medium bag, and 3” for the large bag). With right side of bag out, place handle ends over marks allowing end to overlap past bag top about ¼”. Stitch to secure. Ensure that handles are not twisted before attaching.
- Sew bag sections together. Place the bag piece with handles attached inside the other bag piece, right sides together. Line up side seams. Pin or clip in place. Pin along the top of the bag. Sew ¼” seam around the top. Leave a 4” hole for turning. Backstitch well. Reinforce handles with zig-zag stich. Turn bag and lining through the hole. Press well. Press raw edges of the hole in. Edge stitch 1/8” along the entire top rim of bag.
- Fit finished bag base inside bag.
Finished!


3 comments:
Excellent tutorial - one of the best I've read for gift bags
Thanks for organizing the 12 weeks of interesting holiday project tutorials. alternate email mlwright29(at)hotmail(dot)com
AWESOME tutorial! I cannot wait to get home from vacation and try it. I LOVE From the Blue Chair designs!!! They're fantastic!
Nice blog... thanks for sharing with us..
Post a Comment