Tuesday, October 30, 2012

October is nearing it's end, let's give you some Kathy Davis fabric to enjoy!

photoWEB

We hope you enjoyed the closet organizing accessories in the Kathy Davis post.  Kathy Davis is one of the top greeting card artists for American Greetings. Much like her fabric, her cards also are beautiful water color paintings with words of inspiration and joy.  Now we'd like to "scatter joy" which is Kathy's signature style.  Do you use your sewing to scatter joy whether as a gift for a friend or family or as a charitable endeavor? Perhaps your sewing and quilting is your little joyful secret! Tell us about the joy you scatter of feel when you sew or quilt.  Six random commentators will be chosen at random to receive six, 1 yard cuts of one of Kathy's fabric collections.  Winners will be announced on Monday. We can't wait to read your joyful musings! Best Blogger TipsShare/Bookmark

Monday, October 29, 2012

12 Weeks of Christmas-Week 5

Looking for a quick yet impressive hostess gift this holiday season?  Need something to make a dull and boring bottle of wine a little more personal?
How about whipping up an easy wine bag?

wb 12 cover

Whether you're gifting wine, spirits or olive oil, this fabric gift bag adds a special touch.

Change up your fabric and this makes a great gift for a hostess, your girl friend or that hard-to-buy-for guy.

It's a great way to use some fun and festive fabric, and it takes 30 minutes or less to sew. (Gotta love that!)

Supplies:
2 Fat Quarters (coordinating prints)
rotary cutter
quilting ruler
Quick Turn tool
iron
coordinating thread
hand sewing needle
scissors
wb 1
* The fabric used for these wine bags is Seven Wonders by Parson Gray.
* All seams are 1/4."

Let's get started!
1. From both fat quarters, cut a piece 12" x 17."

2. Decide which fabric will be your outer fabric and which will be your lining.

wb 2

3. Fold your fabric in half length wise, right sides together.  With your outer fabric, start at the bottom of the fold and sew along the bottom and along up to the top. No need to backstitch.

wb3

4. Press your fabric. Using your ruler, mark a 1.5" x 1.5" square on each bottom corner of the bag.

wb 4

5. Use your scissors and cut away the squares you just marked.

wb 5

Pinch your bottom seam and side seams together on each corner to make gussets. Match up the edges and sew with a 1/4" seam. Backstitch at the beginning and end.

wb 6


wb 7

6. Repeat steps 3, 4, and 5 for your lining fabric however, leave a 2" opening along the tall side of your fabric, backstitching at both ends of the opening. You will turn the fabric bag inside out through this opening in a few minutes.


wb 8

7. Now, turn your outer fabric right side out. With your lining fabric (still wrong side out) place your outer fabric inside the lining fabric so that right sides touch. Nestle the bottoms of the bags together and line up your seams and top raw edges.

wb 9

Sew the top seams together, all the way around, back stitching at the beginning and end.

wb 10

8. Pull the outer fabric through the opening in the lining then press the opening closed. Using a blind stitch or ladder stitch to sew the opening closed.

9. Push the lining fabric down into the outer fabric and shimmy things around a bit until it fits nicely. Now topstitch along the top seam to give it a nice finish.

wb 11

10. To make the coordinating tie, cut a 2.5" x 20" piece of lining fabric. Fold the fabric in half, right sides together and sew using a 1/4" seam.
Use the Quick Turn to turn the fabric tube inside out. Press with the seam centered in the middle. For each end, fold the raw ends inside the tube about 1/4" and stitch closed, backstitching at both ends.

wb 12 cover
Ta-da! You're done! Pop in a bottle of wine, spirits or olive oil and you've got something special!

If you enjoyed this tutorial, check out my other projects, tutorials and quilt-alongs at Ellison Lane Quilts!

Happy Sewing!

Best Blogger TipsShare/Bookmark

Monday, October 22, 2012

12 Weeks of Christmas-Week 4!

Can you believe we are on Week 4?! I hope you have been whipping up those tutorials because Christmas is right around the corner! Thankfully, we have another great tutorial today that you are going to love. Melissa from 100 Billion Stars brings you this one so click on the link below to view! And when you are done checking out this tutorial, stop over at Melissa's blog for a giveaway!


Best Blogger TipsShare/Bookmark

Monday, October 15, 2012

Scatter Joy with Enchantment by Kathy Davis!

Editor's Note: It's October and we are featuring well-known greeting card artist Kathy Davis. Kathy loves to "Scatter Joy" which is why all of her collections have "joyful" words describing all the goodness life holds. Her newest collection, Enchantment, is no exception.


When it comes to organizing your closets, why not make it all about romance? With its misty watercolor florals and butterfly accents, my “Enchantment” fabric collection for FreeSpirit is my most romantic to date. Here, you’ll find hand-painted anemones and roses that float effortlessly across beautifully textured backgrounds – all in soft hues with just a whisper of sweetness. “Enchantment” in 27 Cotton fabrics and 9 Cotton Sateen designs offers you three colorways to choose from: Amethyst, Coral or Silver Sage.
Watch what happens when you add “Enchantment” fabric to dull, utilitarian boxes and hangers! Suddenly, organizing your closet becomes a fun activity instead of a chore.

We chose the subtle, sophisticated Silver Sage fabric for this quick-and-easy “no-sew” project that will bring you almost instant results. From wooden hangers, to boxes in a variety of shapes and sizes the fabric can be easily applied to provide you with your own “custom” collection of pretty-and-functional storage containers – for shoes, off-season clothing, sweaters, blankets…you name it! It’s a wonderful way to accessorize your space in a fresh new way.

Fabric Covered Hangers
Wooden dress or shirt hangers
Ribbon
Hot glue/glue gun
FreeSpirit Enchantment by Kathy Davis

Cut 1.5-2” strips of fabric (from selvage to selvage). Start by fastening the end of the first strip with hot glue to the hanger. Wrap around the hanger and fasten again with hot glue. Keep wrapping additional strips until hanger is covered with a nice padding. Tie a bow around the metal hook with a coordinating ribbon and secure the bow with hot glue.

Fabric Covered Boxes
3 sizes of ready-to-assemble cardboard storage boxes
FreeSpirit Enchantment fabric by Kathy Davis (amount varies depending on size of boxes)
Spray adhesive
Scissors

Lay unfolded box lid (outside facing up) on the underside of fabric. Cut around lid, so that there is 1-2”extra on all 4 sides. Spray the outside of the lid with adhesive and flip over onto underside of fabric. Smooth fabric to minimize wrinkles. Spray around the inside edges of the lid. Fold fabric over and press down. Cut out corners of fabric. Fold in the lid per the box assembly instructions. Repeat this process for the box bottom. (Note: Metal clips can be helpful in keeping the fabric adhered to the cardboard while the spray adhesive dries.)

For more insights into the world of Kathy Davis, visit us at kathydavis.com.

COMING SOON:

• FreeSpirit Pocketful of Poppies, my new bright, whimsical fabric design. 20 Cotton fabrics available in January 2013.
• A new Kathy Davis line of home organizing products – for storage, laundry, everything you need to organize your home in colorful ways that are sure to bring you joy!
Best Blogger TipsShare/Bookmark

12 Weeks of Christmas-Week 3!


Hi, I am Bianca and I blog over at Sweet Diesel Designs, where you will find that I love to blog about my sewing adventures. I hope that you'll pop in and say hello! It's rather hard to believe that we are quickly approaching the holiday season. And what better way to package your special gifts than by using a handmade drawstring bag. I am excited to be the next stop on the 12 weeks of Christmas and to share with you my quick and easy drawstring bag tutorial. All right, let's get started...you will need the following fabric.


1- 9" X 21" exterior fabric 2- 11" X 10.5" interior fabric 2- 3" X 9" top panel fabric 2- 2" X 30" drawstring fabric 1. Place 1 top panel on each short side of the exterior fabric, right sides together. With 1/4" seam allowance, sew the panel and exterior fabric together and press the seams open.


2. Place 1 interior fabric on each short side of the top panels, right sides together. Sew and press seams open. You will have one continuous long piece of fabric.


3. With the right sides together, fold the fabric in half and match the interior fabrics together. Pin along both sides and the bottom, leaving a 4" opening at the bottom of the interior fabric for turning. Sew and press seams open.


4. To gusset the bottom corners, take your ruler and measure 1" from the interior seam allowance and with your pencil, draw a line making a box. Cut along those 2 lines.


5. Fold the fabric to match the seam allowances and pin. Sew 1/4" from the edge. Repeat on both interior lining corners.


6. Turn the bag inside out, matching your top panels seams together. The top panel will be 1" wide on the exterior and interior.


7. Once the bag is turned right side out, sew the opening in which you turned the bag closed.


8. To make the casing for your drawstring, sew 1/2" above and below where the seam of the exterior and top panels come together.


9. Take the drawstring and fold the ends over 1/4" and stitch down, creating the finished end to the drawstring.


10. Take the drawstring fabric and fold it in half, press. Open and then fold each side to match your press line.


10. Then fold in half again to meet the side edges.


11. To create the opening in the casing, carefully take your seam ripper and pick out the stitches in both side seams.


12. Take a safety pin at the the end of the drawstring and carefully feed through 1 1/2 times so that you have 1 drawstring out of each casing hole that you created.


13. Tie in a bow and voila...a quick and easy drawstring bag that would be wonderful way to wrap up your holiday gifts.

Best Blogger TipsShare/Bookmark

Monday, October 08, 2012

Winners, winners, winners . . . Katharine's Wheel

We selected six random commentators from the Katharine's Wheel post and each will receive six, 1 yard cuts.  Congratulations to Vrooman's Quilt; Peggy; Jenelle, Beatrix from Kindershop, Maureen Cracknell Handmade and Cecilia.  We can't wait to see what you make from Nel's fabric. 

Watch for our next designer installment feature well-known greeting card artist Kathy Davis who loves to "Scatter Joy" not only in life but in your sewing and quilting.  Stay tuned!

pock_of_Poppies_preview
Best Blogger TipsShare/Bookmark

12 Weeks of Christmas-Week 2!


Hi All!  I'm Amy from Stitchery Dickory Dock, where I blog all about my quirky quilting additions, and my adventures in modern motherhood and homemaking, among other things.  Would love to make your acquaintance so do pop over and say hello!

I'm so excited to be today's stop on the 12 Weeks of Christmas series!  I'm going to share with you my tutorial on these darling ruffled mini wallets.  These make fabulous little gift card holders, that double as business or credit card holders as well.  Great stocking stuffers and gifts for teachers, co-workers, and even kids.


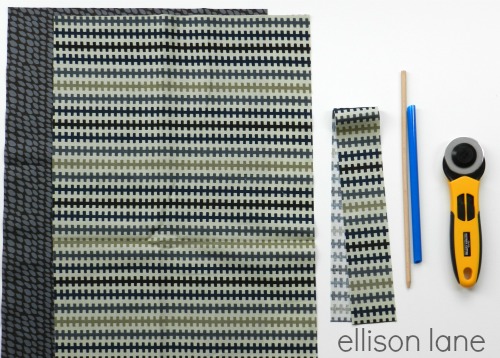
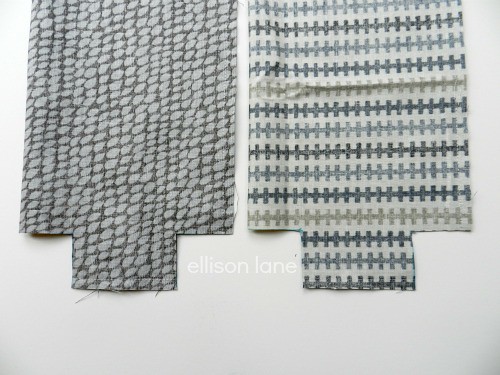
Step 1:  Cut your pieces, following the guide below.  Also, do note that you may use any medium-heavy weight double-sided fusible interfacing.  I like the Pellon Peltex Heavy Duty for this project because it makes for a thicker, more substantial wallet.  Also, you'll see in this pic that I'm only 5 prints- I chose the same print for my pockets and for my strap- but you may of course choose to utilize different prints for these.


Step 2:  Adhere the wrong side of one of your exterior pieces to your interfacing piece by following the pressing instructions on the interfacing.  NOTE: Since this is double-sided fusible interfacing, you'll need to put a piece of parchment paper or a no-melt craft surface under your piece while pressing, to avoid adhering it to your ironing board!


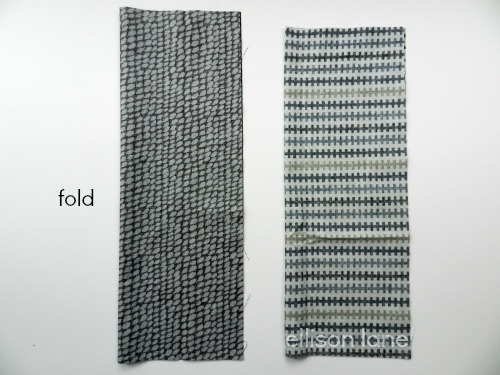
Step 3:  Press your 2 pocket pieces in half with the fold along the 4" side, then top stitch 1/4" from the fold on both pieces.  In this same step, you'll also attach your velcro or snap pieces.  Position them 1/2" from the raw edge, centered.


Step 4:  Next, press your 3 ruffle strips in half lengthwise.


Step 5:  To gather your ruffles, simply set your machine to it's highest upper tension, and largest stitch length. These stitches will gather the fabric as you stitch, but will be loose enough to allow you to adjust and position the ruffle as needed.


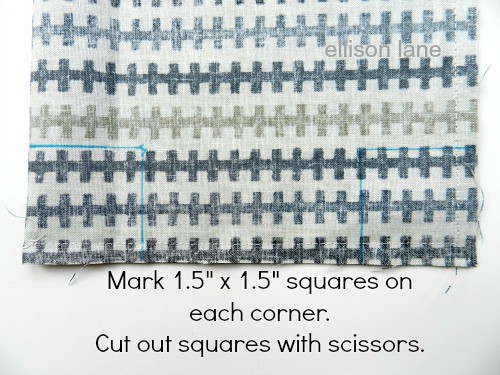
Step 6:  Now let's attach the ruffles.  First find the center point of your interfaced exterior piece by folding it in half along the 4" length, and then mark it at each side with a pin.  Now pin your first ruffle to the piece, leaving 1/4" from the bottom edge for seam allowance.  Be sure the folded (finished) edge of your ruffle is pointing toward the outside, or "bottom" of the piece.


Stitch the ruffle to your piece by sewing over the gathering stitches (don't forget to reset your tension and stitch length to their normal settings).


Add the remaining 2 ruffles in the same fashion, positioning them so that the fold of each ruffle barely covers the stitching of the previous ruffle.  This spacing should leave you about 1/2" left between the raw edge of the top ruffle, and the center point marking (this is where your strap piece will go).


Step 7:  This is my favorite way to make straps!  Take your strap piece and press the edges to the center, along the length of the strip.


Then press in half, hiding the raw edges inside.


Step 8:  To attach the strap, first align and pin the strap above your top ruffle covering the raw edge (but at or below the center point of your exterior piece)- this is the spot where your wallet will fold in half, so you want the strap just below the fold, not on it.

Now, cut the strap excess at the edge of the piece, and set the excess aside- we'll add it back on in just a couple of minutes.


Stitch the strap piece down using an 1/8" seam allowance on both edges.


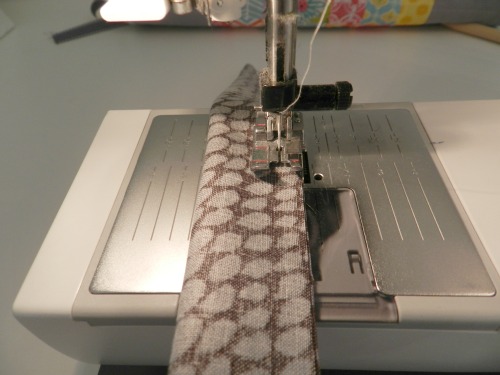
Now pull out your remaining strap piece and top stitch it using a 1/8" seam allowance on both sides.


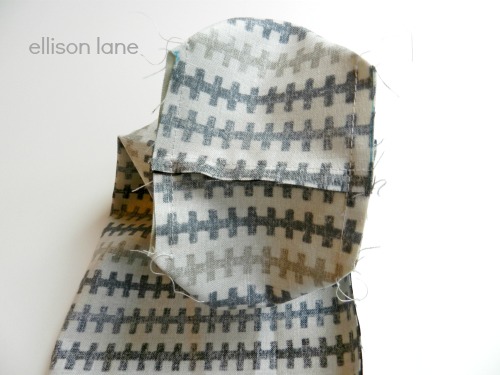
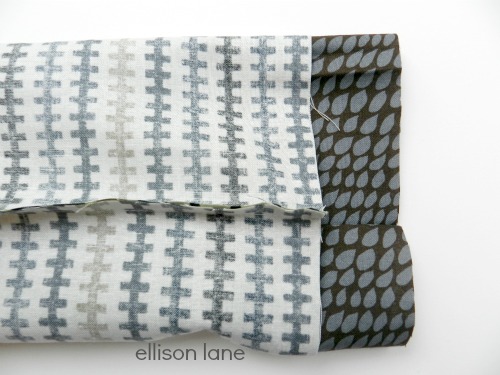
Step 9:  Now take your remaining exterior piece (the one without the interfacing), and pin the pocket pieces to the right side of it, aligning the folded edges toward the center, and the velcro (or snap) pieces facing up and to the outsides.


Step 10:  Here's where the remainder of the strap comes back in.  Fold it in half and align the raw edges directly on top of the right side of the strap that you stitched to your ruffled piece.  Pin it snuggly.

Here's what your two pieces should look like at this point.  


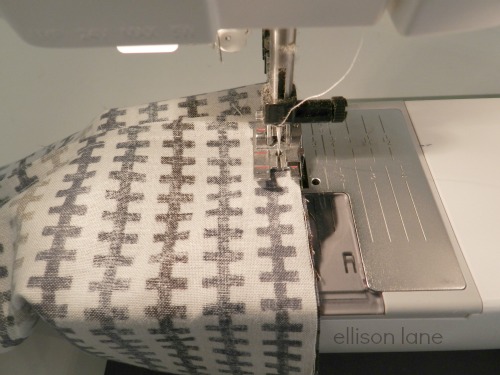
Place these two pieces right sides together, and pin all the way around, making note to leave a 3.5" opening at one of the ends.  

*There are two things to take note of as you prepare to stitch around this piece using a 1/4" seam:  1) Make sure the fold of your strap is tucked toward the center of the piece, so you don't accidentally stitch over it, and 2), Smoosh your bottom ruffle away from your seam allowance so you don't sew over it...BUT, be sure the raw edges on each side of all 3 of your ruffles are flat and not crumpled, so they lay nice and flat when you turn your piece.

Be sure you back tack your stitches at the beginning and end of your seam.


Step 10:  Clip your corners.

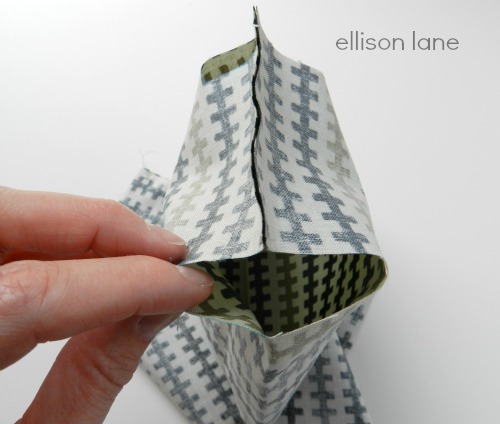
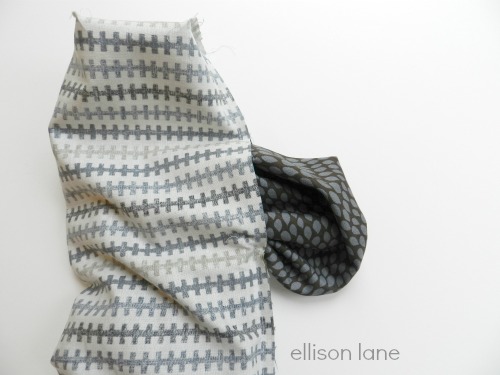
Step 11:  Now to turn the piece.  A forewarning: this is without a doubt the most "hairy" step of this project, but I promise, you can do it!  If you're using the heavy duty Pellon interfacing like I did, it's going to feel, at first, like you can't possibly turn this thing!  The key is not being afraid to crunch up the interfacing...put some muscle into it!  Don't worry, the wrinkles will press right out, so crunch away!  I found that rolling it a bit helped too (you can see what I mean in this photo).


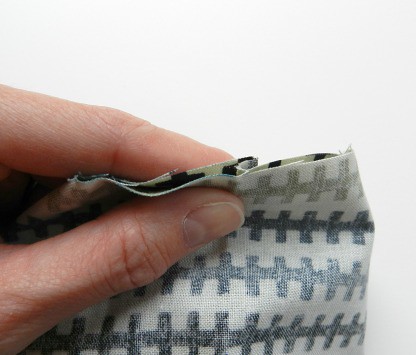
Step 12:  Almost done!  Now give your whole piece a nice hot steamy press, including tucking those raw edges in at the opening.  Since we're using double-sided fusible interfacing, this step is really going to help strengthen your wallet, as the two pieces will now be not only stitched together, but also bonded together.

Step 13:  To finish up, whip stitch the hole closed, and fold the piece in half (press the fold if you like).


There you go!  A cute little wallet, sure to be a favorite in your handmade holiday gift arsenal.  Hope you enjoyed this tutorial, and would love to see it if you do make one!  Pop over at say hi on my blog.


Best Blogger TipsShare/Bookmark