Alright everyone, it's time for our first tutorial for our 12 Weeks of Christmas! So keep reading for an awesome tutorial by Holly!
Hi there! I'm Holly from
Bijou Lovely, where I blog about all of my sewing and quilting projects, among other things! I'm really excited to share a tutorial with you today as part of Freespirit's 12 Days of Christmas series! I'm going to show you how to make these nested fabric trays, which are perfect as a hostess gift for a holiday party or a Christmas gift for family and friends.
To make a set of 3 fabric trays, you will need:
6 coordinating fat quarters
3/4 yd Peltex 71F or 72F (single or double sided fusible - either will work)
Thin, rigid cardboard (you can recycle a used medium flat rate priority box for the large tray!)
Coordinating thread
Coordinating perle cotton or embroidery thread
Possibly a set of pliers
You will also need a rotary cutter, ruler, sewing machine and embroidery needle for handstitching.
Step 1: Cut fabric, interfacing, and cardboard. You will need to pair up 2 fat quarters for each tray, one for the outer tray fabric, and one for the inner tray fabric. Follow the cutting instructions below to make one tray of each size.
Step 2: Layer the outer tray fabric on top of the interfacing, with the fusible side of the interfacing facing the wrong side of the fabric.
Step 3: Use your iron to fuse the interfacing to the fabric. If your interfacing is fusible on both sides, you will want to use a pressing cloth at this point so the other side doesn't fuse to your ironing board.
Step 4: Lay the outer tray fabric/interfacing down with the outer fabric facing up. Place your inner tray fabric on top of the outer tray fabric. The fabrics should be right sides together.
Step 5: Align the edges of the fabrics and pin the layers together.
Step 6: Using a 1/2" seam allowance, sew around all four sides of the fabric, making sure to leave an opening in one of the short sides that is large enough to fit your cardboard through. Backstitch at the beginning and end of your stitching.
You'll want to make sure the opening that you leave is as long as the short side of the cardboard so you can slip it in later, since the cardboard won't really bend.
 Step 7: Clip the corners, making sure not to cut the stitching.
 Step 8: Trim the seam allowances to 1/4" from your stitching line. On the open side, trim to 3/8" so you can close the opening later.
Step 9: Press the seam allowance open on the open side.
Step 8: Trim the seam allowances to 1/4" from your stitching line. On the open side, trim to 3/8" so you can close the opening later.
Step 9: Press the seam allowance open on the open side. This will make it easier to have a clean edge later when we close the opening.
Step 10: Turn the tray right side out through the opening. This might be a little difficult because the Peltex is so stiff! Push the corners out with a chopstick or turning tool to make nice pointy corners.
When the tray is fully turned with nice corners, press the seams.
Step 11: Insert the cardboard into the opening.
Step 12: Pin the opening closed. Push the cardboard to the middle of the tray so it's out of the way at this point.
Step 13: Topstitch around all four sides using a 1/4" seam allowance. Pay special attention when closing the opening to make sure you are grabbing the extra seam allowance to keep it closed. Backstitch at the beginning and end.
Step 14: Center the cardboard within the middle of the tray. It should be about 2-3/8" from each edge of the tray when it's centered.
Step 15: Pin the cardboard in place.
Step 16: Topstitch along the edges of the cardboard, as close as you can get without actually sewing through the cardboard. Backstitch at the beginning and end of your stitching.
Step 17: Fold the sides of the tray up and pinch at the corners to make a right angle. Fold the triangle shaped corners you create by pinching towards the short sides of the tray.
Step 18: Use binder clips to hold the corners in place.
Step 19: Thread a needle with about 50" of embroidery thread (all 6 strands) or perle cotton. Double up the thread so it is twice the thickness, and tie a knot at the end of the thread.
Step 20: Take a stitch through the back fold of a corner towards the center of the tray (this will help hide the knot).
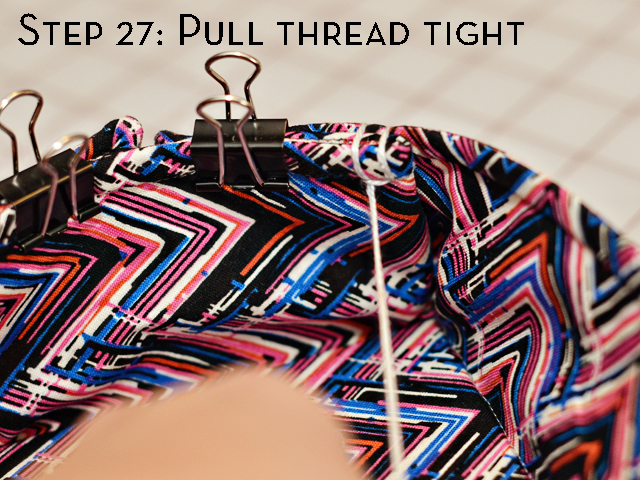
Step 21: Pull the thread all the way through until it's taut.
Step 22: Loop the thread that you just pulled through the inner tray around to the outer tray, and insert the needle into the corner at the topstitched line. The needle should go through all three layers of the tray, and back into the previous stitch you had made in the last step.
Step 23: Pull the needle through all of the layers. You might need to use a thimble or a pair of pliers to do this, it's much easier than struggling with your bare hands.
Pull the thread tightly to join the corner fabric layers together.
Step 24: Take another stitch from the inside of the tray to the outside, about 1/4" towards the middle from the last stitch you took, along the topstitching line. Again, use pliers if you need to!
Step 25: Pull the thread through almost completely, catching a small loop at the end with your finger.
Step 26: Place the needle through the loop you just made.
Step 27: Pull the thread tightly to continue joining the corner fabric layers. It helps to pull in a downward motion at the end so the loop closes correctly.
 Step 28: Repeat steps 24 - 27 to continue stitching down the corner.
Step 29: Continue making stitches until you've reached the end of the corner.
Step 28: Repeat steps 24 - 27 to continue stitching down the corner.
Step 29: Continue making stitches until you've reached the end of the corner. When you've reached the end, make sure to tie a tight knot in the end of your thread. You can hide your knot between the layers if you want, like we did in step 20. Stitch each corner individually so they all stay tight. You can add stitching down the corners of each tray too if you want, just by using a running stitch.
Step 30: When all corners are finished, press the sides of the tray to help them stand up straight. This will also fuse the fabric to the interfacing if you used double sided Peltex.
Repeat the tutorial to make the rest of your trays, one of each size. There are a lot of steps, but they come together really quickly!
I really hope you enjoyed this Nesting Fabric Tray tutorial! Use them to decorate your own house, or give them away as gifts!


great tutorials for some great trays.
ReplyDeleteThese are neat! I like the gift idea, but I think I need one for myself, first. :)
ReplyDeleteThank you Bijou for the sweet tutorial! Great gift idea for my girls. Thank you for sharing today...Judith, Texas
ReplyDeleteVery innovative! I love the fact that you incorporated hand work detail! Well done Holly :)
ReplyDeleteThanks for a great tutorial!
ReplyDeleteFantastic tutorial! The hand stitching details are great and really seem to compliment the fabric well. :) I could see the stitches in neon colors too!
ReplyDeleteLoved this tutorial. Thanks a bunch!
ReplyDeletethose are really fun! thanks for sharing!
ReplyDeleteThanks for the tutorial, I need some inspiration for christmas.
ReplyDeleteGreat tutorial, and a great way to use some of that fabric that we wouldn't use for other projects. I love those little clips. Use them all of the time!
ReplyDeleteGreat tutorial. Fabric trays are useful for everything. They would be great to put a gift in and some cellophane around it.
ReplyDeleteI make other fabric bowls and trays and was very pleased to see this one. Love the idea of nesting. I wondered if I could use buttons and button holes to lose the corners so that they trays could store flat in our trailer?
ReplyDelete