Pat Sloan Christmas in July 2012 "Through the Window"
Hi I'm Pat Sloan and I love to quilt. So when John Adams of Quilt Dad asks me if I wanted to join in on a fun project ... I ALWAYS said yes! John is always involved with the best projects.. and this "Christmas in July" is a blast! I was sent this yummy set of FreeSpirit fabrics... but.... I spy solids.. always a challenge for me to work with. And I LOVE a challenge
Hi I'm Pat Sloan and I love to quilt. So when John Adams of Quilt Dad asks me if I wanted to join in on a fun project ... I ALWAYS said yes! John is always involved with the best projects.. and this "Christmas in July" is a blast! I was sent this yummy set of FreeSpirit fabrics... but.... I spy solids.. always a challenge for me to work with. And I LOVE a challenge
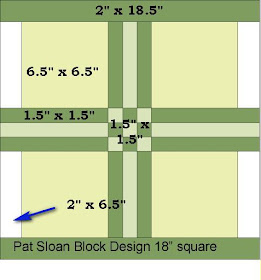
The next thing was to pick a block size, lucky for me the LARGE 18" finished block was still available.. that print is BIG and I didn't want to cut out anything.
here are the cutting directions
• Big Print - Cut 4 blocks 6.5" x 6.5"
• Solid White – Cut 4 strips 2" x 6.5"
• Solid Green-
◦ Cut 2 strips 2" x 18.5"
◦ Cut 4 strips 1.5" x WOF
◦ Cut 4 strips 1.5" x 8"
◦ Cut 1 strip 1.5" x 5"
◦ Cut 2 strips 2" x 18.5"
◦ Cut 4 strips 1.5" x WOF
◦ Cut 4 strips 1.5" x 8"
◦ Cut 1 strip 1.5" x 5"
• Small Print -
◦ Cut 1 strip 1.5" x WOF
◦ Cut 2 strips 1.5" x 5"
◦ Cut 1 strip 1.5" x WOF
◦ Cut 2 strips 1.5" x 5"
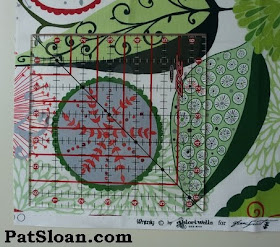
So how about fussy cutting those big squres. Move your ruler around to see what makes a cool block.
Maybe this one... it's more interesting then just having a circle in the center of all four blocks.
These are the four blocks I cut. I like that there is variety and I partial circles.
Tip – often you need more fabric inorder to really have variety in a large print.
Tip – often you need more fabric inorder to really have variety in a large print.
Lets sew the sashings!
• Sew a WOF green solid to both sides of the WOF small print
• Sub cut 2 units that are 6.5" long.
• Sub cut 2 units that are 8" long.
• Sub cut 1 unit that is 1.5" wide. Sew the center bit
• Sew the small print to either side of the remaining green solid
• Sub cut 2 units 1.5" wide.
Sew the center unit and then position all the pieces so you sew them correctly. At this time you can switch around the large squares until you like the position.
And here is your "Through the Window" block. Want to know why I called it that? In my dream world our snow would be colorful, and this fabric is perfect for colorful snowflakes. Looking through my window to watch the snow fall is what my block is about.
Be sure you are signed up for my email newsletter so you get the info when I send it out http://blog.patsloan.com/ right side bar
... listen to my weekly Radio Shows!(also recorded!)
...Read my Daily Blog
...I have a GREAT Quilt group where you can meet lots of quilt friends http://www.quiltmashup.com/


What does WOF mean?
ReplyDeleteWOF means Width Of Fabric. Thanks!
ReplyDeleteYour block is so pretty. Thanks for the tutorial. I too see snowflakes as color. LOL
ReplyDeletequilting dash lady at comcast dot net
Great looking block Pat. Thank you. I really love that shade of green in these fabrics.
ReplyDeleteI totally agree with you it does make it more interesting by not putting the circles in the middle. Colored snowflakes is an interesting concept but what color would they be? Thanks for the tutorial I really like your block.
ReplyDeletePat, I absolutely love all those colored snowflakes through the window. Great block! Thank you FreeSpirit for the Christmas in July.
ReplyDeleteI am going to just grab whatever comes out of my scrap piles for this quilt! Can't wait to see how neat it looks! Bev (kwiltpharm@aol.com)
ReplyDeleteI am making your block, and I have green pieces left over; I have 2) 1.5"xWOF and all 4) 1.5x8". I'm not sure where they go since the window panes are sub cuts from putting the 1.5"xWOF small print and 2) 1.5"xWOF green together. I used the 2) 1.5x5" small print and 1) 1.5x5" green for the small center cubes. Where do my extra green pieces go? Im confused.
ReplyDeleteMy block is all together and I swapped out the plain green for the bars and 9-patch with a red print and it zings!! Impatiently waiting for the next step!!
ReplyDeletebev (kwiltpharm@aol.com)
You are fantastic Pat. Love you block and will try it. Thanks for sharing and will check out your other groups and twitter...Judith, Texas
ReplyDelete